1. Git 常用 Tips
1.1. 远程仓库修改
如何将git@github.com:lupguo/hyde-hyde.git 仓库内容,初始化到本地/data/repos/www/hyde-hyde-tkstorm 裸仓库中?
 1
 2
 3
 4
 5
 6
 7
 8
 9
10
11
12
| # 在本地创建裸仓库
git init --bare /data/repos/www/hyde-hyde-tkstorm
# 进入裸仓库目录 & 添加远程仓库
cd /data/repos/www/hyde-hyde-tkstorm
git remote add origin git@github.com:lupguo/hyde-hyde.git
# 拉取远程仓库的内容
git fetch origin
# 创建并切换到一个新的分支(可选)
git checkout -b main origin/main
|
1.1.1. 本地仓库修改
如何更改本地 git 仓库的 remote origin?
 1
 2
 3
 4
 5
 6
 7
 8
 9
10
11
| # 进入本地仓库目录
cd /data/repos/www/hyde-hyde-tkstorm
# 查看当前的远程origin配置
git remote -v
# 更新remote url地址(移除当前的远程origin & 添加新的远程origin 或者 直接通过 set-url修改也可)
git remote remove origin
git remote add origin ssh://mygitman@tkstorm.com:36000/data/repos/www/hyde-hyde-tkstorm
# 拉取新远程origin的内容
git fetch origin
# 检查并设置本地分支与远程分支的跟踪关系
git branch -vv
|
1.1.2. git submodule 变更
项目使用了 submodule 处理,需要做下变更和提交
1
2
3
4
5
6
7
8
| # 更新子模块的URL,把themes/hyde-hyde子模块的URL更新为新的URL。
git submodule set-url themes/hyde-hyde new-repos-url
# 提交主仓库的修改:
git commit -m "Update submodule URL for themes/hyde-hyde"
# 推送
git push
|
1.2. GIT 的裸仓库和非裸仓库差异
裸仓库的主要作用是作为中央代码存储库,用于协作开发和代码共享。它不包含工作目录,因此不能直接在裸仓库中进行代码编辑和修改。相反,开发者可以克隆裸仓库到本地,进行代码编辑和提交,然后将修改推送回裸仓库。
非裸仓库适用于个人开发和本地版本控制,它既包含Git 的元数据,也包含实际的代码文件。开发者可以直接在非裸仓库中进行代码编辑、修改和提交,而无需克隆和推送到远程仓库。
选择使用裸仓库还是非裸仓库取决于项目的需求和开发团队的工作流程。通常情况下,裸仓库更适合多人协作和远程代码共享,而非裸仓库更适合个人开发和本地版本控制。
常用的格式化字符串及其含义
%h:提交的短哈希值。%cn:提交者的姓名。%ce:提交者的电子邮件地址。%cd:提交日期(使用-date选项指定格式)。%s:提交的主题(即提交的消息)。
 1
 2
 3
 4
 5
 6
 7
 8
 9
10
11
12
13
14
15
16
17
18
| # %(refname:short)表示分支的名称
# %(upstream:short)表示与之关联的远程分支的名称
# %(committerdate:format-local:%Y/%m/%d %H:%M:%S)表示修改时间按照"年/月/日 时:分:秒"的格式输出
# %(subject)表示分支的备注信息。
git branch --format='%(refname:short) %(upstream:short) %(committerdate:format-local:%Y/%m/%d %H:%M:%S) %(subject)'
...
main origin/main 2023/06/21 01:08:22 --other: 同步master代码
master origin/master 2023/09/16 19:56:54 --blog: 移除多余的console.log打印内容
# git log 格式化输出,包含最近2次的 摘要、提交人、提交时间(格式化成年/月/日 时:分:秒)、提交备注
git log --format='%h %cn %cd %s' --date=format:'%Y/%m/%d %H:%M:%S' --name-only -2
...
3cfe0d6 lupingguo 2023/09/16 19:56:54 --blog: 移除多余的console.log打印内容
static/js/tkstorm.js
9c7a77b lupingguo 2023/09/16 19:47:01 --blog: 将.gitsubmodule从github更新到tkstorm.com下
.gitmodules
|
1.4. Git Server 服务配置(可以改为基于 ssh 协议)
1.4.1. 远程服务端: git 访问用户创建
1
2
3
4
5
6
7
8
9
| // root创建mygitman账号
useradd mygitman
passwd youpass
// 登入mygitman账号 & 初始化基本ssh环境
ssh-kengen
// 将需要访问git srv服务器的用户的公钥加入到受信认证清单(也可以后续在客户端通过ssh-copy-id操作)
$ cat /tmp/id_rsa.john.pub >> ~/.ssh/authorized_keys
|
1.4.2. 远程服务端:git 空仓库初始化
1
2
3
4
5
6
| // 在/srv/git仓库下初始化一个空仓库
$ cd /srv/git
$ mkdir project.git
$ cd project.git
$ git init --bare
Initialized empty Git repository in /srv/git/project.git/
|
1.4.3. 本地客户端端:初始项目,推送代码到远端
协议部分也可以支持 ssh 协议,诸如ssh://user@host/srv/git/project.git
 1
 2
 3
 4
 5
 6
 7
 8
 9
10
11
12
13
14
| // client1: 本地Mac操作,初始化一个本地仓库,加入remote源,并推送到remote源
$ cd myproject
$ git init
$ git add .
$ git commit -m 'Initial commit'
$ git remote add origin git@gitserver:/srv/git/project.git
$ git push origin master
// cleint2: 可以支持受信的用户clone访问了
$ git clone git@gitserver:/srv/git/project.git
$ cd project
$ vim README
$ git commit -am 'Fix for README file'
$ git push origin master
|
1.4.4. git-shell 安全设定
由于我们是 useradd 加入的普通账户,当前所有这些用户也可以登录服务器并以 git 用户身份获得 Shell,我们可以通过git-shell命令代替 bash 或 csh 该帐户的登录 shell:
 1
 2
 3
 4
 5
 6
 7
 8
 9
10
11
12
13
14
15
16
17
18
19
20
21
22
23
24
25
26
27
28
29
30
| // 加入git-shell到 etc/shells 中
$ cat /etc/shells # see if git-shell is already in there. If not...
$ which git-shell # make sure git-shell is installed on your system.
$ sudo -e /etc/shells # and add the path to git-shell from last command
// 修改过git账户的默认shell为git-shell
$ sudo chsh git -s $(which git-shell)
// 在MAC端测试
$ ssh git@gitserver
fatal: Interactive git shell is not enabled.
hint: ~/git-shell-commands should exist and have read and execute access.
Connection to gitserver closed.
// 防止git的使用账户,转发端口等行为,需要进一步在`authorized_keys`进行限制,加上`no-port-forwarding,no-X11-forwarding,no-agent-forwarding,no-pty` 选项设定
$ cat ~/.ssh/authorized_keys
no-port-forwarding,no-X11-forwarding,no-agent-forwarding,no-pty ssh-rsa
AAAAB3NzaC1yc2EAAAADAQABAAABAQCB007n/ww+ouN4gSLKssMxXnBOvf9LGt4LojG6rs6h
PB09j9R/T17/x4lhJA0F3FR1rP6kYBRsWj2aThGw6HXLm9/5zytK6Ztg3RPKK+4kYjh6541N
YsnEAZuXz0jTTyAUfrtU3Z5E003C4oxOj6H0rfIF1kKI9MAQLMdpGW1GYEIgS9EzSdfd8AcC
IicTDWbqLAcU4UpkaX8KyGlLwsNuuGztobF8m72ALC/nLF6JLtPofwFBlgc+myivO7TCUSBd
LQlgMVOFq1I2uPWQOkOWQAHukEOmfjy2jctxSDBQ220ymjaNsHT4kgtZg2AYYgPqdAv8JggJ
ICUvax2T9va5 gsg-keypair
// 再次在MAC端测试
$ ssh git@gitserver
PTY allocation request failed on channel 0
fatal: Interactive git shell is not enabled.
hint: ~/git-shell-commands should exist and have read and execute access.
Connection to ioio.cool closed.
|
1.5. 仅下载 Github 上的指定目录内容(转 svn)
- 从浏览器 URI 中找到要下载的内容,比如
https://github.com/computer-system-education/os-syllabi/tree/master/material/tsinghua-os-2019-spring - 将
tree/master转成trunk - 转成
svn checkout(稍微会等一会): svn checkout https://github.com/computer-system-education/os-syllabi/trunk/material/tsinghua-os-2019-spring
完整的 URL 格式说明:
- 如果您对
master分支感兴趣,请trunk改用。所以完整的路径是trunk/foldername - 如果您对
foo分支感兴趣,请branches/foo改用。完整的路径看起来像branches/foo/foldername
P.S. 如果愿意,您可以svn ls在下载之前查看可用的标签和分支
2. Submodule 使用
2.1. Submodule 常规操作
参考:https://git-scm.com/book/zh/v2/Git-工具-子模块
2.1.1. submodule 初始化添加
 1
 2
 3
 4
 5
 6
 7
 8
 9
10
11
12
13
14
15
16
17
18
19
| // 在已有的git仓库中使用子模块,add后会在当前目录下,新增一个名为DbConnector的库
$ git submodule add https://github.com/chaconinc/DbConnector
// git status查看,新增文件
.gitmoudules
DbConnector
// cat .gitmodules,该文件随版本控制,同时modules中的url应该可以被访问
// 其中的配置,也可以通过git config submodule.DbConnector.url newUrl来覆盖
[submodule "DbConnector"]
path = DbConnecor
url = https://github.com/chaconinc/DbConnector
// 在主仓库提交,git commit后,看到160000模式,该模式为特殊模式,即将提交项纪录,而非纪录为文件或文件夹
$ git commit -am 'added DbConnector module'
[master fb9093c] added DbConnector module
2 files changed, 4 insertions(+)
create mode 100644 .gitmodules
create mode 160000 DbConnector
|
2.1.2. 含 submodule 模块项目 clone
 1
 2
 3
 4
 5
 6
 7
 8
 9
10
11
12
13
14
15
| // 克隆含子模块的项目
$ git clone https://github.com/chaconinc/MainProject
...
// 进入项目,并查看到包含.gitmodules文件,同时相关gitmodules对应仓库文件为空
// 初始化子模块配置,并从该项目中抓取所有数据,并检出府项目中的提交
$ git submodule init
$ git submoduel update
// init+update上述两步可以合成一步(在项目clone后,执行这个)
$ git submodule update --init
// 如果子模块还有嵌套的子模块,需要加上--recursive
$ git submodule update --init --recursive
// clone+init+update,可以合成一步,即在clone一个含submodules项目适合,直接加入`--recurse-submoduels`参数
$ git clone --recurse-submodules https://github.com/chaconinc/MainProject
|
Tips: 为安全起见,如果 MainProject 提交了你刚拉取的新子模块,那么应该在git submodule update后面添加--init选项,如果子模块有嵌套的子模块,则应使用--recursive选项
2.1.3. 进入 submodule 目录,进行拉取更新操作
 1
 2
 3
 4
 5
 6
 7
 8
 9
10
11
| // 从子模块远端拉取上游修改
cd DbConnector
git fetch
git merge origin/master
// 回到主项目,执行diff查看更新差异,其他类型诸如log和short
// 可以通过git config --global diff.submodule diff来配置,配置后,可以在全局的.git/config配置中看到
git diff --submodule=diff
// fetch+merge上述两步,可以合成一步,完成子模块更新并更新
git submodule update --remote
|
2.1.4. submodules 模块中的 url 有变更的情况
1
2
3
4
5
6
7
| // 如果不想每次都指定--recurese-submodules选项,可以通过`git config submodule.recurse true`
$ git pull --recurse-submodules
// 若直线pull或者submodule更新失败,需要同步修改git submodules的URL
将新的URL同步到本地中
$ git submodule sync --recursive
$ git submodule update --init --recursive
|
2.1.5. submodules 模块处于游离状态
在主项目中,运行了 git submodule update,从子模块仓库更新了子项目后,子仓库会留在游离 HEAD 状态,意味着本地没有工作分支跟踪改动,这样即使后续再子项目文件中做了修改,提交后也可能会丢失,因为没有合并到主分支中。
为此,需要先 checkout 到指定分支,拉取最新的远程工作分支,在合并本地子项目中的内容(可以先做 commit 或者 stash)
 1
 2
 3
 4
 5
 6
 7
 8
 9
10
11
12
13
14
15
16
| $ cd DbConnector
$ git checkout master
$ git stash
$ git submodule update --remote --merge
$ git pop (解决冲突)
$ git add .
$ git commit -m 'commit message'
// 回到主项目,同步submodule提交的更新内容(需要加上--merge或者--rebase),否则会重置成为一个游离态的HEAD
// 若忘记加--merge或者--rebase,子模块目录变为游离分支后,重新checkout会到master分支即可
git submodule update --remote --merge
// 若子模块有更新,又没有提交子模块内容,同时又不小心在主模块提交了子模块的更新,这样其他人无法更新到子模块内容,因此需要
$ git push --recurse-submodule=check
// 这里可以通过 `git config push.recurseSubmodules check`,来避免遗忘参数
// 默认参数是on-demand,是他的默认行为
|
2.1.6. submodules 的技巧
foreach,每个子模块中任意命令
1
2
3
4
5
6
7
8
9
| // 子项目均暂存
$ git submodule foreach 'git stash'
// 子项目+分支快速创建
$ git submodule foreach 'git checkout -b featureA'
// 主项目+所有子项目的差异
$ git diff; git submodule foreach 'git diff'
// 设置别名
$ git config alias.supdate 'submodule update --remote -merge'
|
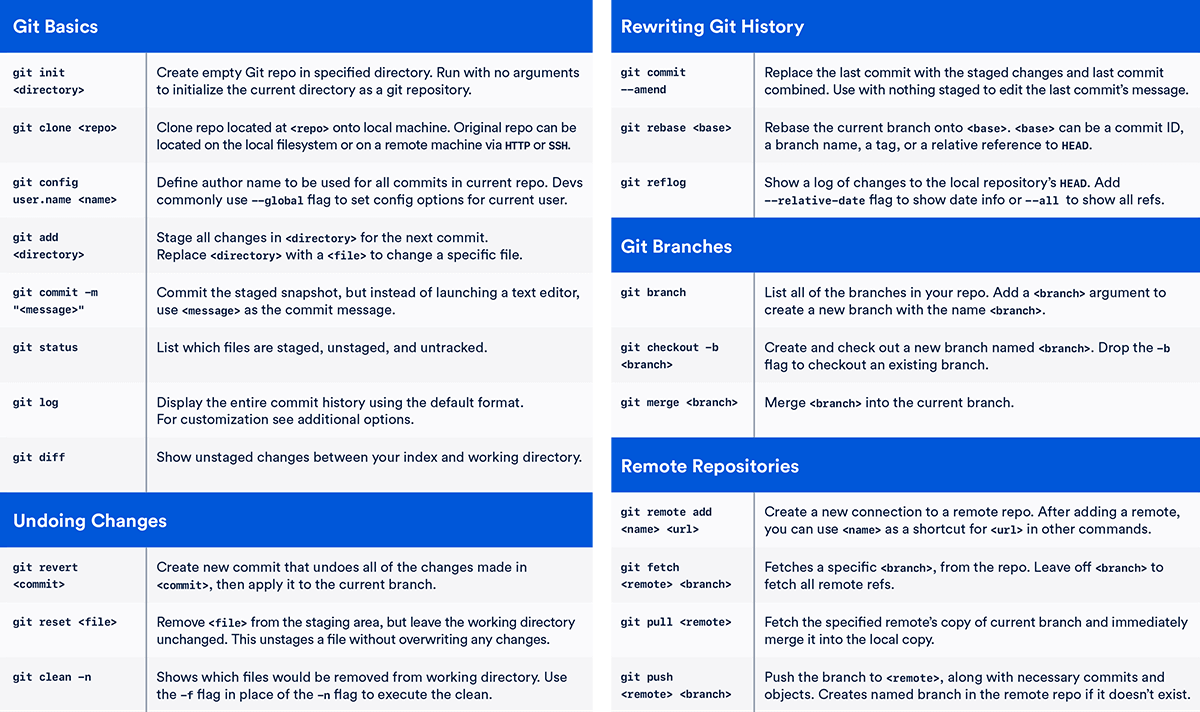
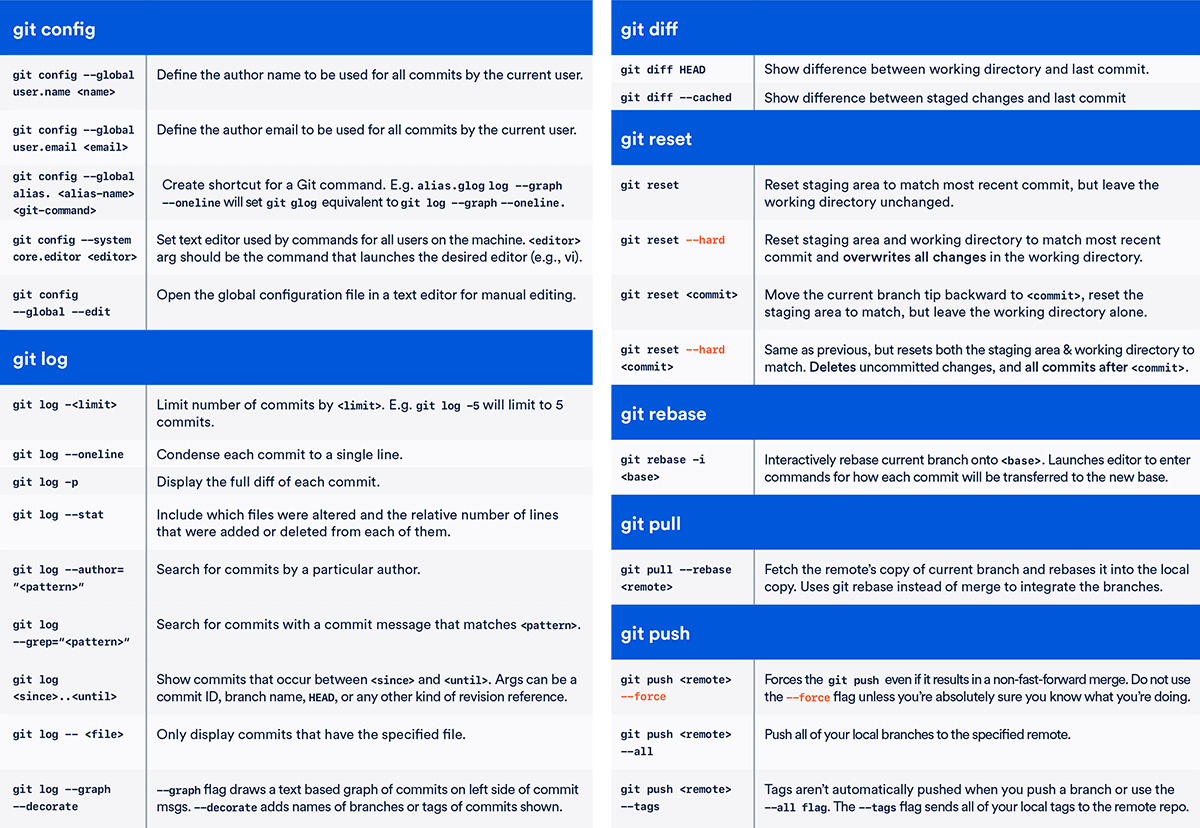
3. Git 基础命令
3.0.1. 命令操作图示
3.0.2. 分支 checkout 切换
1
2
3
4
5
6
| // 拉取并切换到远程指定分支
git fetch origin hotfix-20151118-v1
git checkout hotfix-20151118-v1
// 本地创建一个新分支
git checkout -b newbranch
|
3.0.3. 分支 merge 合并
1
2
3
4
5
6
7
8
| // 1. 切换到合并分支(即最终代码组合的的那个分支,假定为develop)
git checkout develop
// 2. 合并,并形成新的提交点
git merge feature-x
// 3. 合并过程中可能出现冲突,配置命令行冲突解决工具vimdiff
git mergetool --tool=vimdiff
|
3.0.4. 分支 rebase 重放
 1
 2
 3
 4
 5
 6
 7
 8
 9
10
11
12
13
| // 1. 创建一个特性分支&做开发修改
git checkout -b feature-x
// 2. 将feature-x内容重放到develop
git checkout develop
git rebase feature-x
// 3. 可能存在冲突,解决冲突(三方合并)
[fix origin code] && git add .
// 4. 继续rebase
git rebase --continue
git rebase --skip (忽略当次patch,并继续)
|
3.0.5. 放弃修改内容
1
2
| // 丢掉本地所有更新
git reset --hard
|
4. GIT 安装相关
4.1. git 版本过低,如何升级
在 CentOS 中,有通过 Yum 安装了低版本的 git,需要做特定的升级处理,相关步骤如下:
- 先移除旧版本的 git:
yum erase git - Git 安装中,会对其他包有相关依赖,比如
curl-devel、expat-devel、openssl-devel等包:
1
| sudo yum install curl-devel expat-devel gettext-devel openssl-devel zlib-devel
|
- Git 为了能够添加更多格式的文档(如 doc, html, info),你需要安装以下的依赖包:
1
2
| yum install asciidoc docbook2X xmlto
ln -s /usr/bin/db2x_docbook2texi /usr/bin/docbook2x-texi
|
- 下载 Git 安装包, 直接下载:
1
| wget https://mirrors.edge.kernel.org/pub/software/scm/git/git-2.18.0.tar.xz
|
- 解压后安装:
1
2
| ./configure --prefix=/usr/local
make install install-doc install-html install-info
|
4.2. 自动提示
4.2.1. 命令行自动提示
1
2
| $ wget https://github.com/git/git/blob/master/contrib/completion/git-completion.bash -O ~/.git-completion.bash
$ echo "source ~/.git-completion.bash" >> ~/.bashrc
|
4.2.2. 命令行 PS 提示:目录颜色、分支、修改提示
以下两种方式均可满足 git prompt 提示
- bash-git-prompt(开源):
git clone https://github.com/magicmonty/bash-git-prompt.git ~/.bash-git-prompt --depth=1 - git-prompt.sh(git 自带):
https://github.com/git/git/blob/master/contrib/completion/git-prompt.sh
4.2.3. 配置 bash-git-prompt
1
2
3
4
5
6
7
8
9
| // 克隆仓库
git clone https://github.com/magicmonty/bash-git-prompt.git ~/.bash-git-prompt --depth=1
// 加入到 ~/.bashrc:
if [ -f "$HOME/.bash-git-prompt/gitprompt.sh" ]; then
GIT_PROMPT_ONLY_IN_REPO=1
source $HOME/.bash-git-prompt/gitprompt.sh
fi
|
5. GIT CONFIG 配置相关
5.1. git config 命令行操作
5.1.1. 层次关系:库级别 > global 级别 > 系统级别
1
2
3
4
5
6
7
8
9
| // 命令行配置
git config --system
git config —global
git config
// 存储位置
/etc/gitconfig
~/.gitconfig
.git/config
|
5.1.2. 相关 git 的全局设置:
1
2
3
4
| git config --global user.email "tkstorm1988@gmail.com”
git config --global user.name "TkWeber”
git config --global push.default simple
git config --global core.editor vim
|
配置模板:如果你有特定的策略要运用在提交信息上,在系统上创建一个模板文件,设置 Git 默认使用它,这样当提交时,你的策略每次都会被运用:git config --global commit.template $HOME/.gitmessage.txt
5.2. GIT SSH 账号配置,支持免密操作
Git 有时需要用户的凭证才能执行操作; 例如,它可能需要输入用户名和密码通过 HTTP 访问远程存储库。
本节描述了 Git 用于请求这些凭证的机制,以及一些需要避免的特性重复输入这些凭证
5.2.1. 配置 SSH 免密操作(推荐)
参考:https://help.github.com/en/articles/connecting-to-github-with-ssh
- gitlab 仓库:gitlab/github 仓库;
- 利用
ssh-keygen生成本地 ssh key: ssh-keygen -C "github.com" -f ~/.ssh/id_rsa_github - 添加公钥到 gitlab 或者 github 服务器,通常是在设置中心可以找到添加入口;
- 针对 ssh 配置 config(重要)特别注意 User 用户名是(git),host 是小写
 1
 2
 3
 4
 5
 6
 7
 8
 9
10
11
| [Terry@home-mac app-soa]$ ll ~/.ssh/config
-rw-r--r-- 1 Terry staff 196 9 25 17:32 /Users/Terry/.ssh/config
[Terry@home-mac app-soa]$ cat ~/.ssh/config
host github.com
Hostname github.com
User git
IdentityFile ~/.ssh/id_rsa_github
host gitlab.egomsl.com
Hostname gitlab.egomsl.com
User git
IdentityFile ~/.ssh/id_rsa_egomsl
|
5.2.2. ssh 免密操作测试
1
2
3
4
| [Terry@home-mac app-soa]$ ssh -T git@github.com
Hi tkstorm! You've successfully authenticated, but GitHub does not provide shell access.
[Terry@home-mac app-soa]$ ssh -T gitlab.egomsl.com
Welcome to GitLab, guoluping!
|
- 坑点问题,在没有~/.ssh/config 时候,手动创建的话,需要设置好文件权限
1
2
3
4
| //Bad owner or permissions on ~/.ssh/config
chmod 600 ~/.ssh/config
或者
chown $USER ~/.ssh/config
|
5.2.3. 配置 credential.helper(需要输入用户名+密码)
如果通过非 ssh 协议访问仓库,而是通过 https 协议访问,需要提供用户名和密码,为了避免每次都输入用户名和密码,可以配置一个凭证 helper 支持保存用户名密码:
通过git config --help 搜索关键字credential,另外可以通过man 7 gitcredentials查看更多内容,Git 提供了两种方法来减少这种麻烦:
- 给定身份验证上下文的用户名的静态配置。
- 用于缓存或存储密码,或与系统密码钱包或密钥链进行交互的凭据帮助程序。
5.2.4. credential 相关命令行设置参考
Git 认为每个凭证都有一个由 URL 定义的上下文。此上下文用于查找特定于上下文的配置,并传递给任何助手,它可以将其用作安全存储的索引。
例如,假设我们正在访问https://example.com/foo.git,当 Git 查看配置文件(~/.gitconfig)以查看某个部分是否匹配此上下文(两个协议是相同的,两个主机是相同的,不关心路径组件),会采用第一个证书凭证:
1
2
3
4
5
| [credential "https://example.com"]
username = foo
helper = cache --timeout 7200
[credential "https://kernel.org"]
username = foo
|
上述https://example.com等价于通过命令行:git config credential.https://example.com.helper 'cache --timeout 7200'
通过git config --help 搜索关键字credential:
- credential.helper
- credential.useHttpPath
- credential.username
- credential..*
- credentialCache.ignoreSIGHUP
5.2.5. credential 助手(cache、store)
凭证助手是 Git 可以同时请求用户名和密码的外部程序;它们通常与 secure 接口操作系统或其他程序提供的存储。
要使用助手,您必须首先选择要使用的一个。Git 目前包括以下帮助:
- cache: 将凭证在内存中缓存一小段时间。有关详细信息,请参见 git-credential-cache(1)。
- store: 将凭证无限期地存储在磁盘上。有关详细信息,请参见 git-credential-store(1)。
您也可以安装第三方帮助程序;在git help -a的输出中搜索credential-*,从中可以选择了一个 helper,然后就可以通过将其名称放入凭证中来告诉 Git 使用它作为辅助变量:
 1
 2
 3
 4
 5
 6
 7
 8
 9
10
11
12
13
14
15
16
17
18
19
20
21
22
23
24
25
26
27
| // 1. Find a helper.
$ git help -a | grep credential-
credential-cache remote-ext
credential-cache--daemon remote-fd
credential-netrc remote-ftp
credential-osxkeychain remote-ftps
credential-store remote-http
// 2. Read its description.
$ git help credential-store
$ git help credential-cache
git-credential-store - Helper to store credentials on disk
git-credential-cache - Helper to temporarily store passwords in memory
....
// 3. Tell Git to use it.
$ git config --global credential.helper store
// 4. Push a repos and input pass
$ git push http://example.com/repo.git
Username: <type your username>
Password: <type your password>
// 5. [several days later]
$ git push http://example.com/repo.git
[your credentials are used automatically]
|
6. Git 其他问题
6.0.1. 错误 1: terminal prompts disabled
通过go get -u xx/xx更新包时候,遇到fatal: could not read Username for 'https://xx.com': terminal prompts disabled 问题
原因是默认情况下,git 会使用 https 进行 clone,会提示要输入用户名和密码,推荐使用 ssh 免密 clone,参考 https://golang.org/doc/faq#git_https
解决方案,可以通过 git 命令配置通过 ssh 替代 https 进行代码 clone: git config --global --add url."git@github.com:".insteadOf "https://github.com/"
上述处理,等同于配置~/.gitconfig,增加类似下述代码,有的注意 http 和 https 都要配置
1
2
3
4
| [url "git@git.xxx.com:"]
insteadOf = https://git.xxx.com/
[url "git@git.xxx.com:"]
insteadOf = http://git.xxx.com/
|
7. 参考