1. xdebug的简要概述
Xdebug是PHP的扩展,用于协助调试和开发。
- 它包含一个用于IDE的单步调试器
- 它升级了PHP的var_dump()函数;
- 它为通知,警告,错误和例外添加了堆栈跟踪;
- 它具有记录每个函数调用和磁盘变量赋值的功能;
- 它包含一个分析器;
- 它提供了与PHPUnit一起使用的代码覆盖功能。
2. 安装
参见: https://xdebug.org/docs/install
| |
3. 交互调试
Xdebug为调试器客户端提供了一个接口,可以与运行的PHP脚本进行交互。
Xdebug(远程)调试器允许您检查数据结构,交互式地浏览和调试代码。
正在使用的协议是开放的,称为DBGp。该协议在Xdebug2中实现,并取代了不再支持的旧的类似GDB的协议。
3.1. 客户端提供DGBp服务软件
Xdebug的2捆绑一个简单的命令行的客户端为 DBGp协议。还有一些其他客户端实现(包括免费和商业),下面简单列举了几个:
- Eclipse 插件(IDE)。
- JetBrain的PhpStorm(IDE;商业)
- SublimeTextXdebug(Sublime Text 2和3的插件,开源)
- Xdebug Chrome应用程序(Chrome应用程序;开源)
3.2. 启动调试器 - php.ini中进行一些配置设置
- xdebug.remote_enable #启用调试器
- xdebug.remote_host #IP地址和端口
- xdebug.remote_port
- xdebug.remote_connect_back #多个开发人员共享
- xdebug.remote_mode # 发生错误情况时启动会话,这个可以先忽略
| |
4. 激活Xdebug的调试器 - 3类方式
- 从命令行运行脚本时,您需要设置一个环境变量
- 通过Web浏览器启动的脚本,需要携带
XDEBUG_SESSION_START参数,(GET、POST)或者是XDEBUG_SESSION(COOKIE) - 通过Web服务器运行PHP时激活调试器的另一种方法是安装以下四个浏览器扩展之一
- 适用于Firefox的Xdebug Helper
- 适用于Chrome的Xdebug Helper
- 适用于Safari的Xdebug Toggler
- Opera的Xdebug
5. 通讯设置 - CS模式
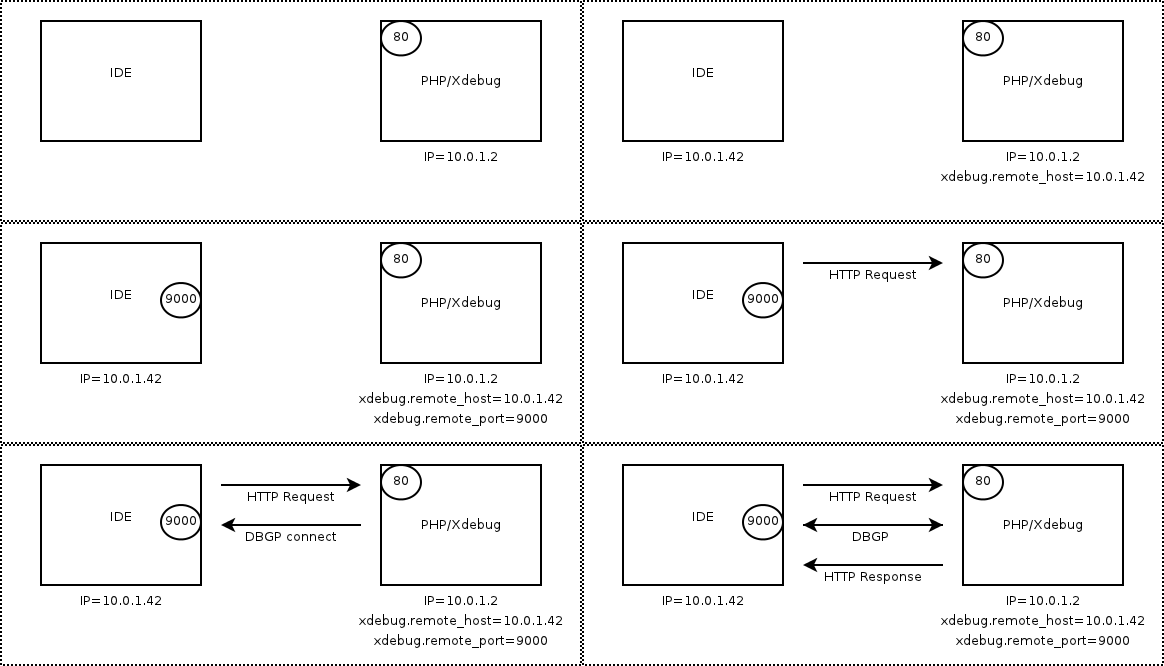
关键点,让DBGp协议构建起来,IDE充当Server,Xdebug充当Client
浏览器=>PHP服务器=>Xdebug请求IDE构建DBGp连接=>DBGp连接建立=>信息调试
5.1. 使用静态IP/单一开发人员
通过远程调试,嵌入在PHP中的Xdebug就像客户端一样,IDE就像服务器一样

- 服务器的IP是10.0.1.2,端口80上有HTTP
- IDE位于IP 10.0.1.42上,因此xdebug.remote_host设置为10.0.1.42
- IDE侦听端口9000,因此xdebug.remote_port设置为9000
- HTTP请求在运行IDE的计算机上启动
- Xdebug连接到10.0.1.42:9000
- 调试运行,提供HTTP响应
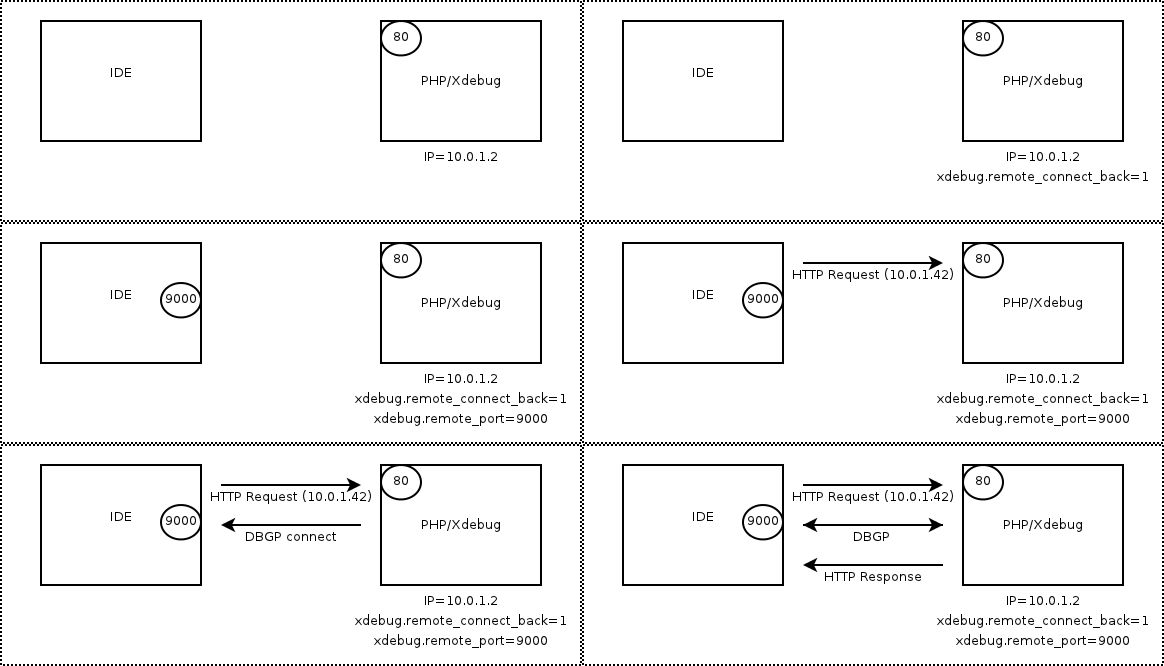
5.2. 使用未知的IP/多个开发人员
使用xdebug.remote_connect_back,则设置略有不同:

- 服务器的IP是10.0.1.2,端口80上有HTTP
- IDE位于未知IP上,因此xdebug.remote_connect_back设置为1
- IDE侦听端口9000,因此xdebug.remote_port设置为9000
- 发出HTTP请求,Xdebug从HTTP头中检测IP地址
- Xdebug连接到端口9000上检测到的IP(10.0.1.42)
- 调试运行,提供HTTP响应
5.3. HTTP调试会话
Xdebug包含通过浏览器启动时跟踪调试会话的功能:cookie。这样工作如下:
- 通过GET或者POST传递,
XDEBUG_SESSION_START=name变量到 Xdebug服务器; - Xdebug会发出名为“XDEBUG_SESSION”的cookie,并将值作为
XDEBUG_SESSION_STARTURL参数的值,cookie的默认到期时间为一小时,但可以通过xdebug.remote_cookie_expire_time设置进行配置; - 当连接到“idekey”属性中的debugclient时,DBGp协议也将相同的值传递给init数据包;
- 当存在GET(或POST)变量
XDEBUG_SESSION_START或XDEBUG_SESSIONcookie时,Xdebug将尝试连接到debugclient; - 要停止调试会话(并销毁cookie),只需添加URL参数即可XDEBUG_SESSION_STOP。然后,Xdebug将不再尝试建立与debugclient的连接。
5.4. Xdebug配置
- xdebug.idekey:控制哪些
IDE KeyXdebug应传递给DBGp调试器处理程序。 - xdebug.remote_autostart:Xdebug也将始终尝试启动远程调试会话并尝试连接到客户端,默认值:0 (开启后,可以不用配置客户端的XDEBUG传递XDEBUG参数了)
- xdebug.remote_connect_back:多用户连接支持,默认值:0
- xdebug.remote_cookie_expire_time:过期时间,默认1小时
- xdebug.remote_enable:是否允许远端调试,默认为0
- xdebug.remote_handler:默认为dbgp协议
- xdebug.remote_host:选择运行调试客户端的(IDE)主机,您可以使用主机名(若设置了多开发人员back选项,则忽略该选项)
- xdebug.remote_port: Xdebug选择运行调试客户端(IDE)主机的服务端口,默认为9000
- xdebug.remote_mode:选择启动调试连接的时机,默认是REQ(脚本启动,Xdebug将尝试连接到调试客户端),还有JIT(出错才连)
- xdebug.remote_timeout:Xdebug在IDE上等待确认传入调试连接的时间量(以毫秒为单位),默认为200,网络环境极差情况可能出现问题;
6. Xdebug的一些概念理解
6.1. 提供了内置的xedebug函数支持
| |
6.2. 替换了默认的var_dump()函数
Xdebug替换了PHP的var_dump()函数来显示变量。Xdebug的版本包含不同类型的不同颜色,并限制数组元素/对象属性的数量,最大深度和字符串长度。还有一些其他功能处理变量显示。
6.3. 提供了更优的内部数据结构打印
- xdebug_debug_zval
- xdebug_debug_zval_stdout
- xdebug_dump_superglobals
- xdebug_var_dump
| |
6.4. stack_trace - 堆栈信息跟踪
当Xdebug被激活时,只要PHP决定显示通知,警告,错误等,它就会显示堆栈跟踪。堆栈跟踪显示的信息及其显示方式可以根据您的需要进行配置。
Xdebug在错误情况下显示的堆栈跟踪(如果display.errors 在php.ini中设置为On)在它们显示的信息量方面相当保守。这是因为大量信息会降低脚本的执行速度以及在浏览器中呈现堆栈跟踪本身的速度。但是,可以使堆栈跟踪显示具有不同设置的更详细信息。
相关配置:
- xdebug.collect_params=1~5: (4较为详细了,默认也是这个)
- xdebug.dump_globals=on
| |
6.5. xdebug提供了GC相关方面的信息输出
6.5.1. xdebug-gc 相关配置
- gc_stats_enable
- gc_stats_output_dir
- gc_stats_output_name
6.5.2. 开启方式
- 全局开启,在ini配置中,xdebug.gc_stats_enable=1
- 直接在PHP脚本中调用函数
xdebug_start_gcstats()和xdebug_stop_gcstats()
| |
6.5.3. xdebug-gc 相关说明
- Collected — The number of so called “roots” that have been garbage collected during this run. A “root” is either an PHP object (- instance) or an array that is under observation by the Garbage Collector for potential cleanup.
- Efficiency% — Is the number of cleared roots divided by 10 000 - a magic number of “roots” when reached triggers PHPs internal - garbage collector to run automatically.
- Duration — Denotes the duration in milliseconds that this garbage collection run took.
- Memory Before — Contains the memory as measured by memory_get_usage() before this GC run was activated.
- Memory After — Contains the memory as measured by memory_get_usage() after the GC run was finished.
- Reduction% — The percent reduction in memory due to this GC run.
- Function — The name of the function or method the GC run was triggered in. If it is gc_collect_cycles() then this means the Garbage - Collector was triggered explicitly. All other values indicate the GC was triggered implicitly due to the 10 000 “roots” reached - metric of the PHP engine.
6.6. 其他相关功能
- 性能检测
- 代码片段分析
这两块可以直接基于docs查阅得知!
7. 在MacOS上面的Docker容器内部署Xdebug注意点
- MacOS中,Docker容器内访问MacOS宿主机器,需要通过
host.docker.internal访问,而不是默认的localhost,端口不能与宿主机器的冲突- xdebug.remote_host = host.docker.internal
- xdebug.remote_port = 9801
- 开启
xdebug.remote_autostart=on,可以不用浏览器的XDEBUG组件传递XDEBUG_SESSION - 设置
xdebug.remote_log=/tmp/xdebug.log,在配置期间调试分析(dbgp协议) - 设置
xdebug.idekey=PHPSTORM,设置对应的idekey
8. JetBrain与Xdebug补充坑点
- 由于Xdebug是采用CS模式通过DBGp协议进行通信,在IDE是版本升级过程中,以及Xdebug的升级过程中,可能出现不兼容(在xdebug最新版与次新版版本的jetbrain就有类似问题);
- 尤其是Xdebug在Remote Host或者Docker容器中的时候,首先需要保证通信连接的正确,其次是IDE客户端与Xdebug版本是匹配的;
- 在设置PHPStorm类似IDE时候,idekey、端口都需要确保是OK的
