Golang Image(一) - 图像简要说明

AI 摘要: 本文简要介绍了Golang中的图片相关概念,包括颜色模型、image/draw包的使用以及图片的resize过程。文章涵盖了颜色模型中的alpha通道、颜色值调和、color.Model的作用,以及image/draw包中对图片进行绘制和对齐的方法。此外,还简要提到了图片resize的四步骤。关键词:Golang, 图片介绍, 颜色模型, image/draw包, 图像resize

1. Golang 中图片介绍

1.1. 颜色模型 - color.Color 和 color.Model

  1. 红色,绿色和蓝色是 α 预乘的,完全饱和的红色也是 25%透明的,
  2. 通道具有 16 位有效范围,100%红色返回 65535 而不是 255
  3. 要保证颜色值调和时候,乘积不会溢出
  4. color.Model 只是可以将“颜色”转换为“另一种颜色”的东西,可能会有损

1.1.1. Color、Model 示例

 1
 2
 3
 4
 5
 6
 7
 8
 9
10
11
12
13
14
15
16
17
18
19
20
21
22
23
24
25
26
27
28
29
30
31
32
33
34
35
36
37
38
39
// 颜色类型
type Color interface {
    // RGBA returns the alpha-premultiplied red, green, blue and alpha values
    // for the color. Each value ranges within [0, 0xFFFF], but is represented
    // by a uint32 so that multiplying by a blend factor up to 0xFFFF will not
    // overflow.
    RGBA() (r, g, b, a uint32)
}

// Colors and Models
//    image_draw01_test.go:47: r=>65535, g=>0, b=>0, a=>0
//    image_draw01_test.go:55: r=>65535, g=>0, b=>0, a=>0
//    image_draw01_test.go:55: r=>0, g=>65535, b=>0, a=>0
//    image_draw01_test.go:55: r=>0, g=>0, b=>65535, a=>0
//    image_draw01_test.go:55: r=>65535, g=>65535, b=>65535, a=>65535
//    image_draw01_test.go:60: convert=>{R:255 G:0 B:0 A:0}, t=>color.RGBA
func TestColorsAndModels(t *testing.T) {
	red := color.RGBA{R: 255}
	green := color.RGBA{G: 255}
	blue := color.RGBA{B: 255}
	gray := color.Gray{Y: 255}

	// rgba(为[0,0xFFFF]
	r, g, b, a := red.RGBA()
	t.Logf("r=>%d, g=>%d, b=>%d, a=>%d", r, g, b, a)

	// 初始化调色板
	plat := color.Palette{
		red, green, blue, gray,
	}
	for _, c := range plat {
		r, g, b, a := c.RGBA()
		t.Logf("r=>%d, g=>%d, b=>%d, a=>%d", r, g, b, a)
	}

	// 调色板Convert转换
	convert := plat.Convert(red)
	t.Logf("convert=>%+v, t=>%[1]T", convert)
}

1.2. 图片中点 Pointer 和矩形 Rectangle 概念 - image.Point 和 image.Rectangle

1.2.1. Point、Rectangle 说明

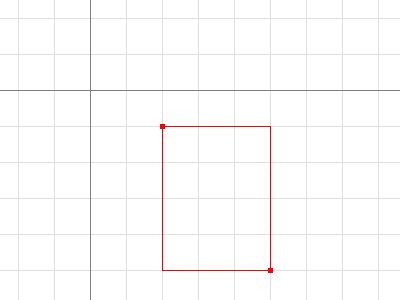
  1. 点是整数网格上的 (x, y) 坐标,轴向右和向下递增。它既不是像素也不是方格。一个点没有固有的宽度、高度或颜色,但下面的可视化使用了一个小的彩色方块。
  2. 矩形是整数网格上的轴对齐矩形,由其左上角和右下角的点定义。矩形也没有固有颜色,但下面的可视化用细彩色线勾勒出矩形,并标出它们的最小和最大点
1
2
3
4
5
6
7
8
9
// 点没有宽高和颜色,既不是像素,也不是网格
type Point struct {
    X, Y int
}

// 矩形类型,Rectangle是整数网格上的轴对齐矩形,由其**左上角**和**右下角**Point定义。方便起见,使用`image.Rect(x0, y0, x1, y1)`,替代了`image.Rectangle{image.Point{x0, y0}, image.Point{x1, y1}}`,Rectangle通常具有非零原点 `Point{0,0}`,网格上的(x,y)坐标,轴向右和向下增加
type Rectangle struct {
    Min, Max Point
}

1.2.2. Point、Rectangles 示例

 1
 2
 3
 4
 5
 6
 7
 8
 9
10
11
12
13
14
15
16
17
18
19
20
21
22
23
24
25
26
27
28
29
30
31
32
33
34
35
36
// Points and Rectangles
//    image_draw01_test.go:78: Dx1=3, Dy=4
//    image_draw01_test.go:79: bounds=>image.Rectangle{Min:image.Point{X:2, Y:1}, Max:image.Point{X:5, Y:5}}, size=image.Point{X:3, Y:4}
//    image_draw01_test.go:83: pX in r1=true
//    image_draw01_test.go:91: r2==r3:true
//    image_draw01_test.go:97: r1==r2:true, ir12=>image.Rectangle{Min:image.Point{X:2, Y:1}, Max:image.Point{X:3, Y:4}}, ir21=>(2,1)-(3,4)
//    image_draw01_test.go:102: r1 interset r4 = image.Rectangle{Min:image.Point{X:0, Y:0}, Max:image.Point{X:0, Y:0}}, rzero==ir14:true
func TestPointsAndRectangles(t *testing.T) {
	// 定义矩形
	r1 := image.Rect(2, 1, 5, 5)
	t.Logf("Dx1=%d, Dy=%d", r1.Dx(), r1.Dy())
	t.Logf("bounds=>%#v, size=%#v", r1.Bounds(), r1.Size())

	// 点是否在矩形内
	pX := &image.Point{X: 2, Y: 1}
	t.Logf("pX in r1=%t", pX.In(r1))

	// 基于左上、右下两点初始化矩形
	r2 := image.Rect(0, 0, 3, 4)
	r3 := image.Rectangle{
		Min: image.Point{},
		Max: image.Point{X: 3, Y: 4},
	}
	t.Logf("r2==r3:%t", r2 == r3)
	r4 := image.Rect(8, 8, 9, 9)

	// 两个矩形相交
	ir12 := r1.Intersect(r2)
	ir21 := r2.Intersect(r1)
	t.Logf("r1==r2:%t, ir12=>%#v, ir21=>%+v", ir12 == ir21, ir12, ir21)

	// 无交集,则返回空的矩形
	ir14 := r1.Intersect(r4)
	rzero := image.Rect(0, 0, 0, 0)
	t.Logf("r1 interset r4 = %#v, rzero==ir14:%t", ir14, rzero == ir14)
}

2. 像素、图像 - Image

图像将矩形中的每个网格方块映射到模型中的颜色。Image 的边界不一定是从(0,0)点开始,正确的应该是基于边框的Min.XMin.YMax.XMax.Y来迭代。

 1
 2
 3
 4
 5
 6
 7
 8
 9
10
11
12
13
14
15
16
17
18
19
20
// 像素点`(x, y)`,表示方格`(x, y), (x+1, y), (x+1, y+1) and (x, y+1)`框定处的颜色
type Image interface {
    // ColorModel returns the Image's color model.
    ColorModel() color.Model
    // Bounds returns the domain for which At can return non-zero color.
    // The bounds do not necessarily contain the point (0, 0).
    Bounds() Rectangle
    // At returns the color of the pixel at (x, y).
    // At(Bounds().Min.X, Bounds().Min.Y) returns the upper-left pixel of the grid.
    // At(Bounds().Max.X-1, Bounds().Max.Y-1) returns the lower-right one.
    At(x, y int) color.Color
}

// 正确的迭代图片像素操作,不一定是从(0,0)开始
b := m.Bounds()
for y := b.Min.Y; y < b.Max.Y; y++ {
    for x := b.Min.X; x < b.Max.X; x++ {
        doStuffWith(m.At(x, y)) // 图片在(x,y)点的Color处理
    }
}

Uniform、RGBA 图像

通常,程序会想要基于像素切片的图像,图像实现不必基于像素数据的内存中切片,例如,Uniform 是一个巨大边界和均匀颜色的图像,其内存表示只是那种颜色。

 1
 2
 3
 4
 5
 6
 7
 8
 9
10
11
12
13
14
15
16
17
18
19
// 纯色颜色,Uniform是一个巨大边界和均匀颜色的图像,其内存表示只是那种颜色
type Uniform struct {
    C color.Color
}


// RGBA类型
//  Pix []uint8 即用一组三原色红绿蓝+Alpha,标识每个像素点颜色
//  Stride int 即像素步幅
//  Rect 标识RGBA图片边框范围
type RGBA struct {
    // Pix holds the image's pixels, in R, G, B, A order. The pixel at
    // (x, y) starts at Pix[(y-Rect.Min.Y)*Stride + (x-Rect.Min.X)*4].
    Pix []uint8
    // Stride is the Pix stride (in bytes) between vertically adjacent pixels.
    Stride int
    // Rect is the image's bounds.
    Rect Rectangle
}

Set(x, y int, c color.Color)方法

1
2
3
4
5
// 创建一个RGBA图片,并设定(5,5)处的像素颜色为指定的RGBA颜色
m := image.NewRGBA(image.Rect(0, 0, 640, 480))

// 图像类型提供`Set(x,y int,c color.Color)`方法,该方法允许一次一个像素地修改图像
m.Set(5, 5, color.RGBA{255, 0, 0, 255})

2.3. SubImage 方法

即在原始图片上,通过左上、右下两个点划分出一个新的图片,类似切片一样:

  1. 修改子图像的像素将影响原始图像的像素
  2. 对于适用于图像的 Pix 场的低级代码,Pix 上的测距会影响图像边界外的像素,比如在示例中,m1.Pix 覆盖的像素以蓝色阴影显示。
1
2
3
4
m0 := image.NewRGBA(image.Rect(0, 0, 8, 5))
m1 := m0.SubImage(image.Rect(1, 2, 5, 5)).(*image.RGBA)
fmt.Println(m0.Bounds().Dx(), m1.Bounds().Dx()) // prints 8, 4
fmt.Println(m0.Stride == m1.Stride)             // prints true

3. Image Formats 图像格式

标准软件包库支持许多常见的图像格式,例如 GIFJPEGPNG,知道源图像文件的格式,则可以直接从 io.Reader 解码。

图片格式转换

 1
 2
 3
 4
 5
 6
 7
 8
 9
10
11
12
13
14
import (
 "image/jpeg"
 "image/png"
 "io"
)

// convertJPEGToPNG converts from JPEG to PNG.
func convertJPEGToPNG(w io.Writer, r io.Reader) error {
    img, err := jpeg.Decode(r)
    if err != nil {
        return err
    }
    return png.Encode(w, img)
}

生成类似二维码的随机头像

 1
 2
 3
 4
 5
 6
 7
 8
 9
10
11
12
13
14
15
16
17
18
19
20
21
22
23
24
25
26
27
28
29
30
31

// 生成QR像素头像
func TestQRHead(t *testing.T) {
	rand.Seed(time.Now().UnixNano())
	// 调色板 palette
	white := color.RGBA{R: 100, A: 255}
	gray := color.RGBA{R: 255, G: 255, B: 255, A: 255}
	palette := color.Palette{white, gray}

	// 图片像素着色
	m1 := image.NewRGBA(image.Rect(0, 0, 6, 6))
	minPot, maxPot := m1.Bounds().Min, m1.Bounds().Max
	for y := minPot.Y; y < maxPot.Y; y++ {
		for x := minPot.X; x < maxPot.X; x++ {
			c := palette[rand.Int()%2]
			m1.Set(x, y, c)
			t.Logf("color=>%+v", c)
		}
	}

	// 图片输出
	w, err := ioutil.TempFile(".", fmt.Sprintf("%d_*.png", time.Now().Unix()))
	if err != nil {
		t.Error(err)
	}
	// 纯色输出
	err = png.Encode(w, m1)
	if err != nil {
		t.Error(err)
	}
}

3.2. 未知图像格式

image.Decode 函数可以检测格式,可识别的格式集是在运行时构建的,不限于标准包库中的格式。图像格式包通常在 init 函数中注册其格式,主包将“下划线导入”这样的包,仅用于格式注册的副作用。

image/png包,通过init(),在其中提供了图像image.RegisterFormat注册格式,方便主包的匿名导入,达到解析 png 的目的

1
2
3
4
5
6
7
8
9
package png // image/png

func Decode(r io.Reader) (image.Image, error)
func DecodeConfig(r io.Reader) (image.Config, error)

func init() {
    const pngHeader = "\x89PNG\r\n\x1a\n"
    image.RegisterFormat("png", pngHeader, Decode, DecodeConfig)
}

image/draw包,通过可选的mask图片,在一个dst图像上,画一个src图片

  • dst = (src IN mask) OP dst,当mast完全不透明,则dst = src OP dst
  • OP支持Over

几何图像对齐

  1. 基于像素彼此对齐,需要src、mask、dst图片,

4. 图像 resize

图片 Resize 四个主要步骤:open、decode、resize、encode

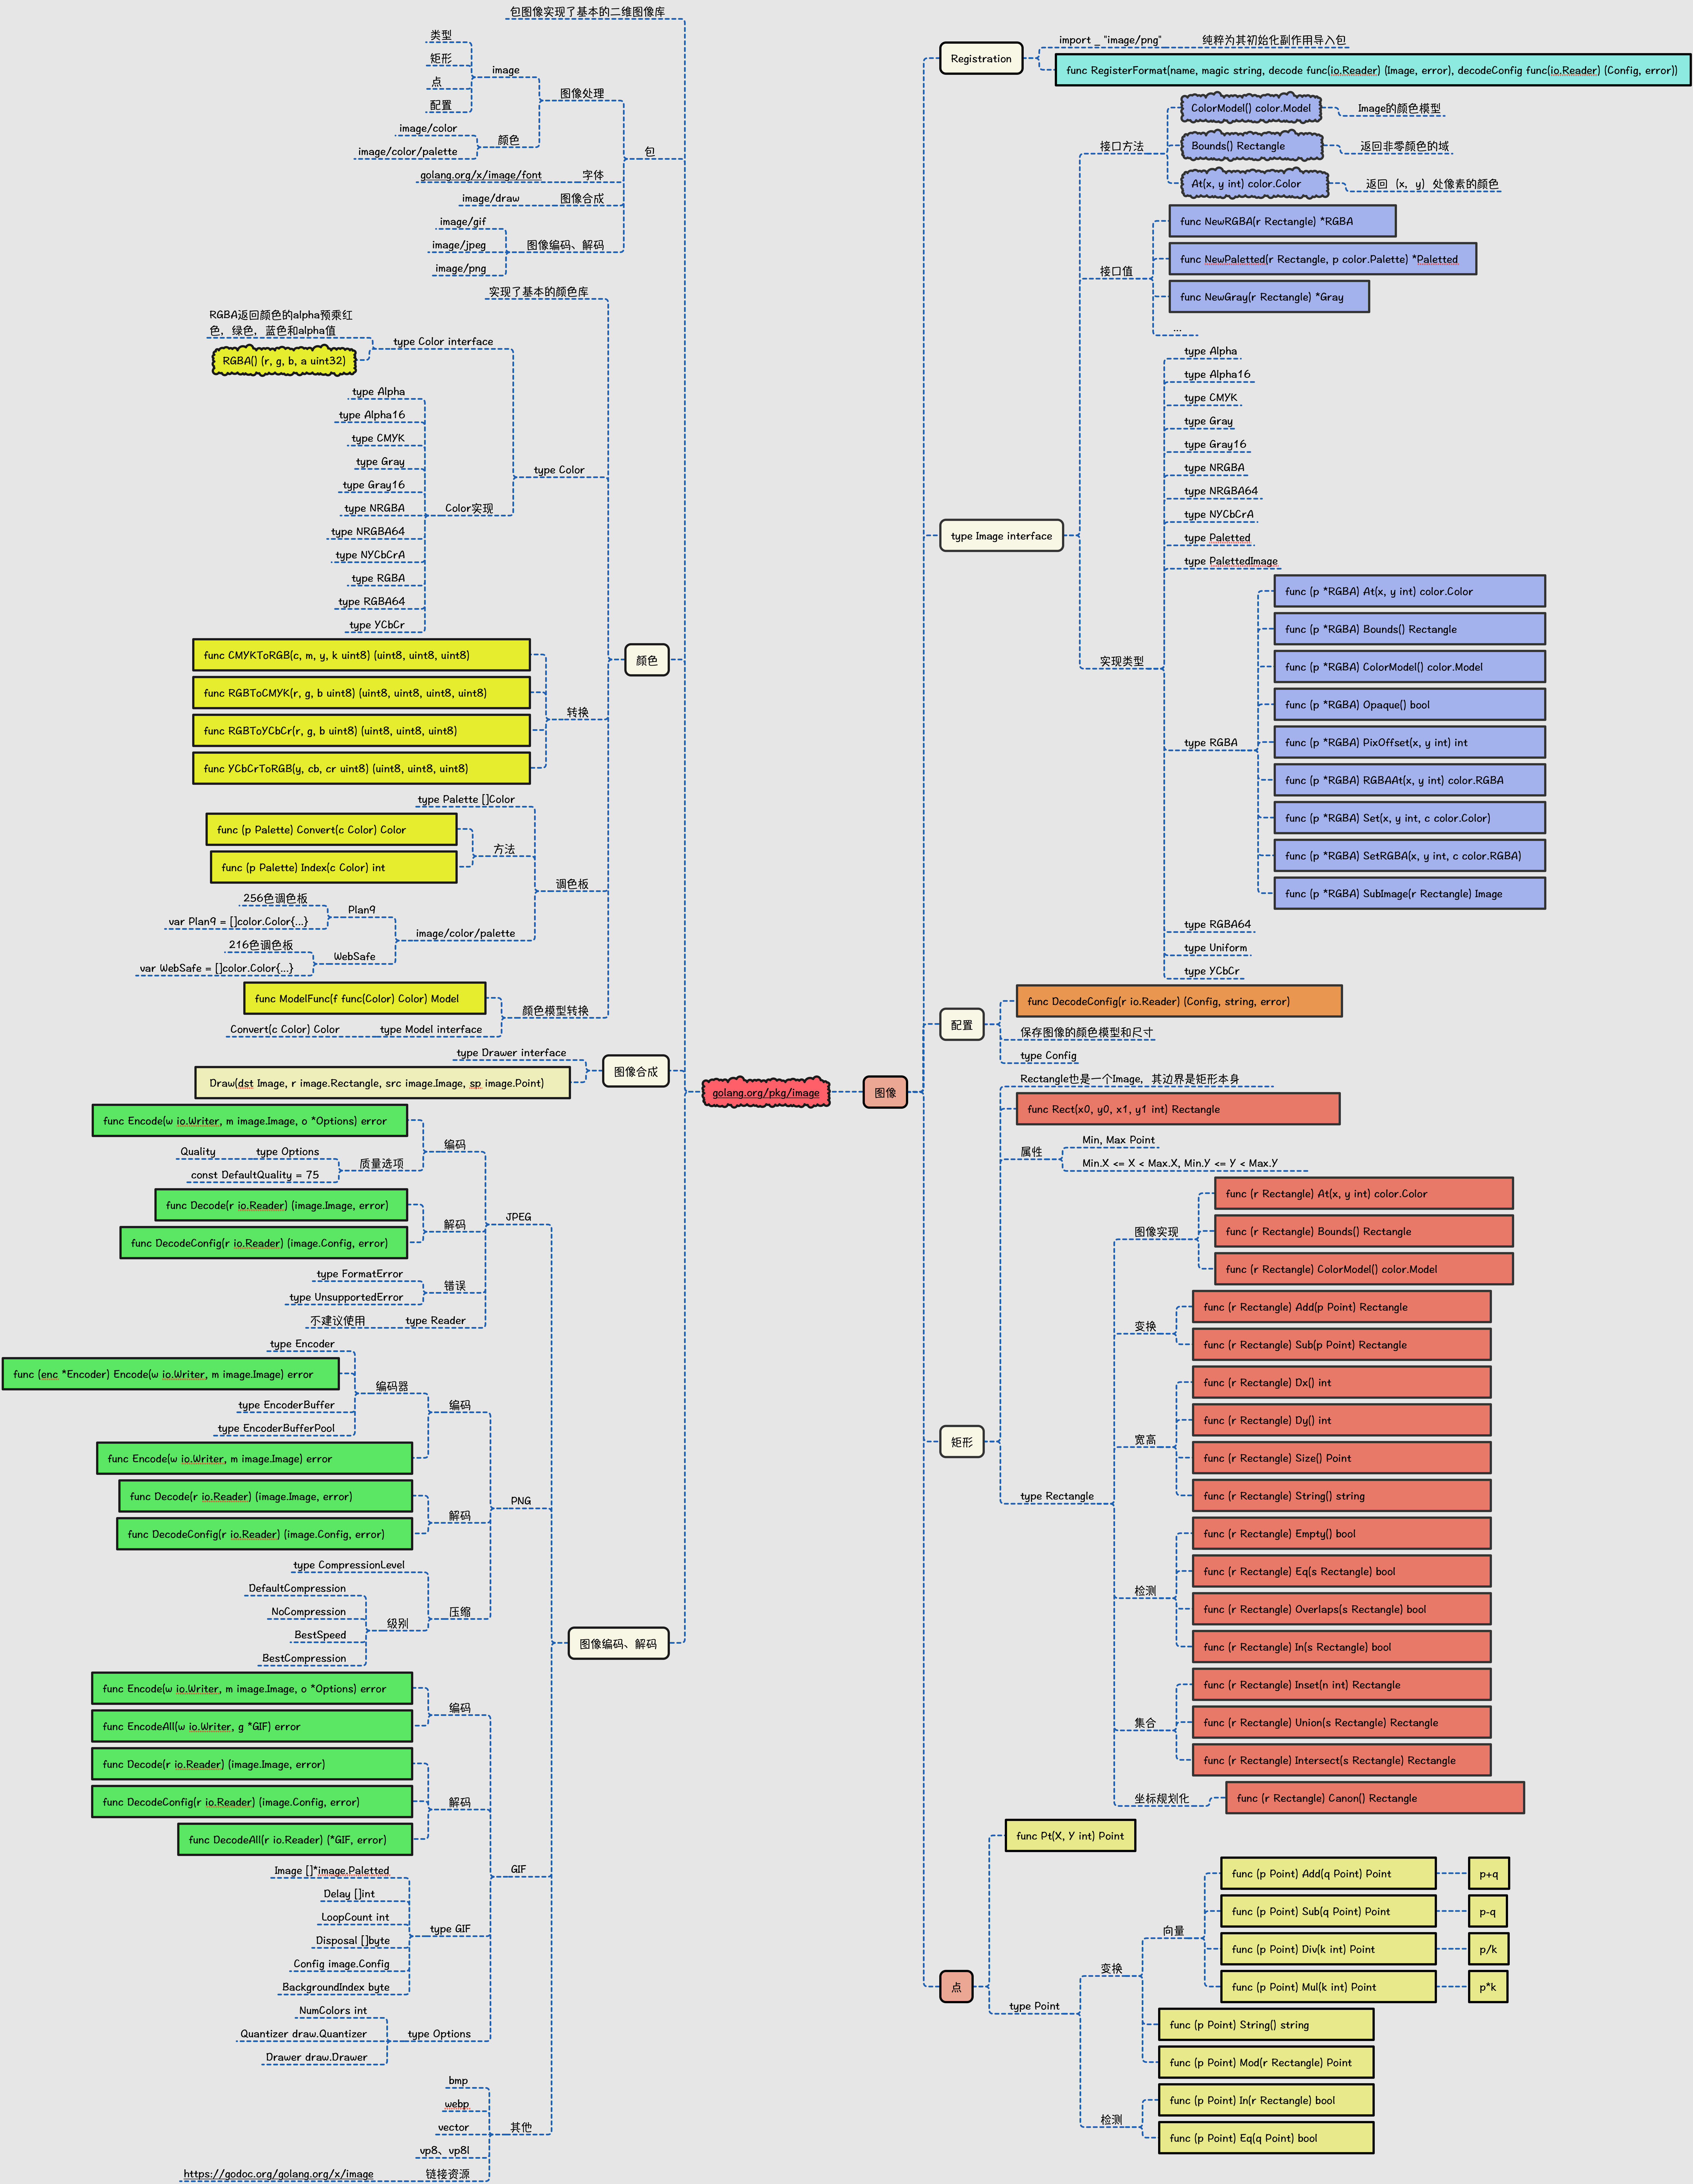
补一张图:

5. 参考